Showing posts with label Dessert. Show all posts

Monday, April 2, 2012

Ideas Welcome, Inspiration on Backorder...

Lately there hasn't been much going on in my kitchen.  I haven't been all that busy, I really have no excuses.  One thing I will say is that I haven't made anything truly inspired lately.  I know with the warmer weather I want to be outside more but food has always been a welcome end no matter how hectic the day has been.


Kitchititipi, Upper Peninsula, MI.  (A pretty picture to distract me from not knowing what to cook. :P)

Lately, food and I have been at odds.

I've more or less run out of ideas that really drive me into the kitchen with an urge to create and be creative.  I lack motivation to make things I've already made and lately we've eaten a lot of bagels (home- baked of course).  I'm in some kind of weird cooking rut and all attempts to get out on my own have seen only very temporary success.  I think it's time for reinforcements.

Thats where you, my faithful readers, come in.

I want you to share all your ideas with me, no matter how crazy they are! What is something that you want converted to be vegan? What do you crave lately?

No matter how crazy the flavor combinations I will consider even the oddest suggestions.  After all I did recently make Jalapeno- Pineapple bagels with a crunch chili pepper crust.

What do you want to see here? What should I make? What have you made recently? Share!

Tuesday, February 21, 2012

Raspberry Mousse Bars


I was so excited about it being my birth month that I have told every one, and I say it out loud at least ten times a day in my own home, which definitely tried the patience of my ever so patient Dan.  Honestly, how does he put up with me?  Maybe it's the desserts!

This recipe is a quick one and allows for a lot of variation.  Don't feel like you have to use the exact ingredients I use, these bars would be delicious with many kinds of berries and with a variety of nut crusts.  Get creative! Or just follow what I've written down, there's no shame in following something tried and true!

I have no idea what I'll do for my birthday on Saturday but it will definitely involve lots of delicious food, wonderful company, and great fun!


Raspberry Mousse Bars (makes one 9x9 or 8x11)
Crust:
2 C. Mixed nuts of your choice (I used pumpkin seeds, macadamia nuts, and almonds, all raw but you can roast them if you like)
2.5 T. Coconut Oil, melted
2-3 T. Palm Sugar
2 T. Flax meal (or substitute sesame seeds if you like them)

Raspberry Layer:
12 oz. package Berry Medley, thawed (Strawberries, Raspberries, Blueberries)
2 T. Dried Cherries
1/4-1/2 lb Firm Tofu (depends on how creamy you want it)
1 t. Vanilla
2-4 T. Palm Sugar (to taste)
2 T. Vegan Mayonaise
Dash Salt
2 T. Agar Agar Flakes (heaping)

Grease a 9x9 or 8x11 baking dish (or whatever dish you are using) and line with parchment paper.  Grease the top of the parchment paper a little too.


Crust:
1. Put everything in a food processor and process until it all sticks together and it a medium-coarse meal.
2. Press into your dish of choice firmly with your fingers.  Sprinkle with a little salt if you like (optional).


Raspberry Layer:
1. Put all ingredients in a high speed blender and blend thoroughly, very thoroughly.  You want all the seeds from the berries to be chopped up.  Scrape down the sides of the blender and run it a few times on high.
2. Transfer the mixture to a small saucepan and simmer for 5-10 minutes to allow the agar agar to dissolve. Stir often so it doesn't burn to the bottom.
3. Remove from heat and pour over the crust mixture.  Allow to cool slightly before putting it in the fridge to set.


Notes:This dessert is quick to make and can be made ahead.  It can also be frozen in single servings and eaten frozen or thawed. If you can't wait for this to set, or yours doesn't set for some reason I find that this is heavenly over vanilla ice cream! Keep covered in the fridge to keep it firm.  I don't expect this dessert to last long!

Thursday, February 2, 2012

Pumpkin Cinnamon Rolls


Happy Groundhog Day!

So because it is my birth month I've decided to indulge myself a bit during the next 30 days.  I decided to start with these magnificent cinnamon rolls! As cliche as it is to say this, it's true that you can't eat just one! I put pumpkin not only in the bread part but in the filling as well to give it a nice velvety texture and sneak in some extra vitamins. So I guess you could argue that these are healthy? Maybe? No? I'm going to pretend they are anyway.

Now this recipe uses the baguette recipe with some modifications.  You can always halve this or you can freeze extra rolls either before or after baking to save them for later.  This is not a "super easy" recipe, it does take a little bit of time, but its well worth it!  These do not need a glaze but if you would like one you could always add that on top after they've baked.

These cinnamon rolls have a distinctive pumpkin and cinnamon flavor, and are moist and delicious.  The bread part is a little more firm so these stay together better while you are eating them.  Don't be shy with the filling! It's really what makes these rolls great!


Pumpkin Cinnamon Rolls ( Makes about 22 Rolls)
Bread:
2.5 C. Bread Flour (plus extra for rolling out the dough)
1 t. Fine Salt
1/4-1/3 Honey (or other liquid sweetener, to taste)
1/4 C. Warm Water
3 T. Maple Syrup
2 1/4 t. Yeast (1 package)
1 C Pumpkin Puree
1/2 t. Ground Cinnamon
1/2 t. Pumpkin Pie Spice

Filling:
1.5 C. Walnuts
1.5 C. Pecans
1/2 C. Pumpkin Puree
1/2 C. Palm Sugar (or brown sugar)
1/3- 1/2 C.  Honey (or other liquid sweetener, to taste)
1/3 C. Maple Syrup
2-3 T. Ground Cinnamon (generous)
1/4 t. Ground Nutmeg (optional)
2 T. Vegan Butter
1/2 t. Fine Salt
9 dates, diced into pea sized pieces
Pinch of Ground Cloves and Ginger

1. Preheat oven to 375 F. Proof the yeast in the warm water.  Mix all other ingredients, plus the yeast mixture in a mixing bowl. Cover with plastic wrap and allow to rise for 1 hour. It won't rise much and that's ok.
2. Put pecans and walnuts in a food processor and pulse until they are a coarse meal. Some larger pieces are ok.  Add nuts and all other ingredients together and mix thoroughly.
3. Divide the dough in two pieces. Roll on a floured surface into rectangles about 10"x14" (less if you want a thicker, more dense bread). 
4. Spread half of the filling on the dough and roll it fairly tightly into a log. Take a sharp knife and cut the log into sections. How many is up to you but I did between 8 and 10 per log depending on how tall I wanted the rolls to be. Mine were about 1.5" or so tall. Repeat for the second log.
5. Place finished rolls on a baking sheet or in a 9" cake pan (non stick or greased) and bake for 20-25 minutes.

Notes: These keep for several days and you can always make them ahead.  I have never frozen them but I imagine that would also work.

Wednesday, February 1, 2012

Happy February!- Triple Chocolate Truffle Torte

Tried to get a picture before it was completely eaten!

For a while now I have claimed the whole month of February as fair game for celebrating my birthday. Even though my actual birthday isn't until later in the month I find ways to celebrate all throughout February.  It's also rather convenient that with Valentines day also being in February there is plenty of chocolate for me...yum.

Dan and I don't celebrate Valentines day because we celebrate how much we love each other many times a year; whether it's a special dinner, a "date night," or just snuggling up to watch a movie. I get to be playfully demanding during my birth month and frequently use it as an excuse for slightly indulgent behavior. :P Dan is a very patient and understanding man, and he humors me the whole way.  How lucky an I?

Getting on to the deliciousness, you really should try this torte. It doesn't take a whole lot of effort, the ingredients are easy to find, and it is very rich and satisfying. If you are looking for a dessert that deserves the label "death by chocolate," look no further!

Triple Chocolate Truffle Torte  (Serves 12)
Crust:
1 C. Whole wheat flour
1/2 C. Vegan Butter or Vegan Shortening
1/2 t. Salt
1 T. White Vinegar
1t. Baking Powder
2 T. Cocoa powder
2 T. Agave (optional)

First Layer: (Mousse Layer)
1 pound Firm Tofu
10 ounces semisweet chocolate chips (or dark chocolate if you prefer)
1 t. Vanilla Extract
3 T. Maple Syrup

Second Layer:  (Ganache Layer)
3-4 Medium Avacadoes
2-4 T. Cocoa Powder
1 t. Vanilla Extract
1 t. Ground Cinnamon
1/4 C. Palm Sugar (or other granulated sweetener)
3 T. Water
Agave (to taste)


Make the Crust:
1. Preheat oven to 350 F. Mix all ingredients with your hands in a bowl until well combined.  Press crust into a greased or non stick spring form pan. Allow some crust to reach up the sides about 1 inch or so.
2. Bake for 15 minutes, remove from oven and allow to cool.

First Layer:
1. In a small sauce pan melt the chocolate chips (you can also use a microwave if you want to) over low heat stirring frequently so they do not burn. Once completely melted remove from heat, add maple syrup and vanilla and mix well.
2. In a blender place the tofu and the chocolate mixture and blend until very very smooth. Use a spatula to scrape down the sides and check for any remaining lumps of tofu.
3. Pour on top of (mostly) cool crust and spread it out so it's even. Place in fridge to cool while you prepare the Ganache Layer.

Second Layer:
1. Put all ingredients in blender and blend until very smooth. You may have to scrape down the sides with a spatula a few times but it's worth it! Keep in mind that granulated sweeteners may need additional time to dissolve so give the mixture an extra minute or two to set before the final tasting  to decide on the sweetness.
2. Pour and spread the second layer over the first.  Chill for 30 minutes before serving for best results.

Notes: There isn't much to say here other than the directions make this seem like it's going to take longer than it will. I made this in about 30 minutes.  The nice thing about this is that it's rich enough that you can eat/serve smaller servings so hopefully it will stick around longer! You can also freeze this if you like more of an ice cream cake consistency or if you want to make it ahead of time.

Happy February!
A close up of the layers.

Saturday, October 15, 2011

Raw Food Love

So back during the time that Dan and I were raw I asked him to make dinner for me once a month since our options for eating out were so very limited.  I just wanted one meal each month that I didn't have to make and preferably was a surprise.  Dan of course did an amazing job each time, and even surprised me.  He didn't pick all simple things either, he really went all out.

Typical Snack
I absolutely loved it when he made me surprise foods.  It didn't matter what he made or even if it tasted good.  The only thing I cared about was that Dan cared enough about me being happy to make me food (and put up with my craziness).

Raw Pizza

Blueberry Cheesecake
So if you're ever trying to stick to a diet, don't be afraid to ask someone to cook you something that adheres to that diet every once in awhile.  It made all the difference for me, and I'm sure Dan got something out of it too :P
Raw Carrot Cake
So when your significant other (or friend) is having a hard time/week/month/year. Don't be afraid to show come home cooked (or uncooked) love! You'd be surprised what a difference one meal can make! Oh, and a little red wine doesn't hurt either!

Monday, October 10, 2011

Kitchen Review- The Blend- Tec

Even though I am super busy with Vegan MOFO (day 10!) I've had time to reflect a lot lately.  Maybe its the fact that my kitchen needs constant cleaning because I've been cooking every day or maybe its the never ending pile of dishes.  I'm not sure.  What I am sure about is that I couldn't do alot of what I do in the kitchen without my Blend-Tec.

I've owned alot of hand-me-down blenders in my day.  Most of them were freebies, all of them broke within a year and never worked well at all.  At one point I was a raw vegan (no cooked food or animal products) and a blender was a vital kitchen appliance.  Even though Im back to just being vegan now I still use this blender almost daily.  Let me give you some examples:


I made all those things and more with a blender.  Now on to other important matters.  I would say some pro's of this blender is that it will blend everything you may ever need to blend while cooking and it will do an amazing job at it. It's also really easy to clean and easy to use a spatula in order to scrape out whatever it is you blended.  The wider base makes it more effective at blending thicker things like filling for a cheesecake (its the only way I make cheesecake filling now because its so fast!), or nut butters.  I've blended ice, and even frozen bananas (for my ice cream) with ease.  I have yet to be disappointed with this blenders performance.  The biggest thing for me is that the base is really easy to clean, just wipe down with a sponge or paper towel.  It has a digital screen and flat buttons that make it a breeze to clean up.

I would say the only real con to this blender is the noise.  Unfortunately, I haven't seen a blender this powerful that wasn't noisy.  Some claim the Vitamix brand is less noisy but I call b.s. on that.  All I can say is that I'm so happy with how well it works that I can forgive the noise.  It's so nice to have smoothies without berry seeds in them (the blender grinds them up) or random chunks of ice.  I can even make a quick soup in minutes.  The convenience of this appliance is a huge benefit.

Well enough about the blender.  If you're in the market you would love the Blend Tec, worth every penny.  Now I have to get back in the kitchen and clean because tonight we are getting started on making hard cider! I'll post all about it tomorrow!

One final thought: What do you use your blender for? I'm looking for new ideas!

Wednesday, October 5, 2011

Chewy Pumpkin Cookies


Usually I am a die hard chocolate chip cookie fan but in the fall I love the flavor of pumpkin.  To me it's just an added bonus that pumpkin is also good for you.  I think it's even better for you when paired with chocolate! I adapted this from a recipe on Have Cake, Will Travel.


Chewy Pumpkin Cookies (Yields 12 large cookies)

1 C. Whole Wheat Pastry Flour
1 C. Ground Oats (oats ground up in a food processor)
1 1/2 t. Ground Cinnamon
2 T. Arrowroot Powder (heaping, very heaping)
1/2 t. Sea Salt
1 t. baking powder
1/2 C. Vegan Butter (or vegetable shortening)
1 C. Palm Sugar (other other vegan granulated sugar)
1/2 C. Honey (or other vegan sweetener)
3/4 C. Pumpkin Puree (be generous)
2 t. Vanilla Extract
1 C. Chocolate chips (you can put in slightly less if you don't like as much chocolate)

1. In a large bowl cream together the sweeteners and the butter or shortening with a mixer.  Add in the vanilla and pumpkin until combined. 

2. Mix together the dry ingredients in a separate bowl.  Fold them into the wet ingredients and mix until combined.  Add the chocolate chips and stir again.

3.  Using a spoon place dollops of cookie dough on a greased cookie sheet and shape them how you would like them.  They wont rise much so flatten them a little.  Put in the fridge until dough is chilled.

4. Preaheat oven to 350F and bake for 17 minutes or until golden brown on the edges.  It may be hard to tell if they are done but a good way to check is to look at the bottoms.  Nicely browned bottoms mean they are done :)

Notes: Baking these too long will cause them to dry out.  If you don't want to bake all the dough you can always freeze some in cookie shaped discs for later!  Store in a sealed container on the counter. 

Monday, September 26, 2011

Vanilla Chai Pear Butter


The other day I wasn't feeling so good.  It was raining, I had a headache, and I had to run a lot of errands when I would have rather been snuggled up inside reading a book and drinking hot tea.  When I finally got home after running the errands I was determined to do something that I wanted to do. What I wanted to do at that moment was make pear butter.

I have fond memories of eating preserved pears right out of the jar when I was a young child.  The syrupy sweetness and softness of the canned pears was my favorite part.  Even though my mom only canned the pears from our tree (or anywhere) once I still remember eating them to this day, more than fifteen years later. I've learned the hard way not to try and re-create the memories of things from my childhood (often ends in disappointment) but I decided to honor those memories with this pear butter.


Vanilla Chai Pear Butter (Yields  four 8oz jars)
8 Pears (I used 4 Bosc and 4 Bartlett)
1.5 inches of cinnamon stick
6 cardamom seeds
Juice of one lemon
1/4 to 1/2 C. Honey or vegan sugar (adjust depending on how sweet you like it)
2 t. Vanilla Extract

1. Peel and core the pears.  Cut into small chunks and put in a crock pot.
2. Add the cinnamon stick and cardamom to the crock pot and allow to simmer for several hours until the pears are very soft.  Remove the cinnamon and cardamom when you are happy with the taste/aroma.  I left mine in for around 3 hours but you may want more or less flavor.
3. Allow pears to cool slightly then transfer to a blender and blend until smooth.  You may have to do this in a few batches, be careful of blending hot things!
4.  Return butter to the crock pot and continue to reduce if necessary. Add the vanilla. If the consistency is how you would like it simply heat the butter until it is just shy of boiling and then put in canning jars.  Water bath can for 15 minutes.

Notes: I know there is a lot of controversy surrounding whether or not to water bath these after canning.  I have made fruit butters many times and not always water bath canned them after. For safety I would put these in a water bath though.  Better safe than sorry!  I'm lucky if the butters last longer than six months since I usually give them away as gifts.  I also use very very ripe pears for this recipe.  Should you not want to can this butter you can allow it to cool and freeze it.  Enjoy!

Five Minute Applesauce


I like applesauce. I think it's natures candy and I love it. It's simply one more thing in life that I greatly appreciate. 

Unfortunately I think the stuff they sell at the store is only good for baking and instead I buy apples and make my own.  There is one thing that Michigan does really really well, and that is growing apples.  So when I saw Michigan apples at the store on sale I bought two bags.  This recipe is super easy, takes 5 minutes, tastes like you spent all day making it, and can be stored in the fridge for quite a while (if there are leftovers).


Five Minute Applesauce
6-7 medium sized apples, cut off the core (no need to remove the skins, adds some texture)
Cinnamon, to taste
Maple syrup (optional, depending on the apples it could be plenty sweet without)
Pinch of salt (optional)
1/2 C. Water

1. Put everything in your blender.  If its having trouble blending you can add more water, but not too much!
2. Blend until smooth.
3. Heat in a sauce pan over the stove until warm (do not boil!) Enjoy!

Notes: If you made too much and you want to store some I put hot applesauce in mason jars with fresh lids and as they cool they suction the lids down.  The applesauce is safe like this for a few days, after that put it in the fridge where its good for a few weeks.  I use this in baking instead of eggs or to give things more moisture, and also use it as a topping for my Easiest Ever Ice Cream.

Tuesday, June 7, 2011

Rhubarb Upside Down Cake

I'm a huge fan of rhubarb.  A really really big fan. So when I saw rhubarb appearing at the farmers market, (and I started having dreams about eating it) I decided to do something about it.  After tweaking the recipe several times I've finally come up with something that I'm quite happy with and is also quick to make.

*See Below
Rhubarb Upside- Down Cake
Makes one 9 inch cake.

One 9 inch cake pan

Cake:
1/2 C. Palm sugar
1-2 T. Earth Balance vegan butter
2 T. agave nectar
4 C. Rhubarb, sliced 1/4 inch thick
1 3/4 C. Whole wheat pastry flour
1 t. baking soda
1 t. sea salt
1 C. Palm sugar or granulated sugar
1/2 C. Coconut oil
1 C. Coconut milk
1 T. pure vanilla extract
Juice from one Lemon (about 2 T.)

1. Preheat the oven to 375 degrees. Generously grease pan with butter. It is wise to line the bottom of the pan with parchment paper to ensure nothing sticks.  Coat greased pan with 1/2 C. palm sugar. 

2. Spread rhubarb evenly in the bottom of the pan and drizzle with Agave nectar. Set aside.

3.   Whisk together flour, baking soda, and sea salt in a large bowl. In a smaller bowl whisk sugar, oil, milk, and vanilla extract. Add the wet ingredients into the dry until well blended. Whisk in lemon juice vinegar and stir quickly (pale swirls will be in the batter, which is the baking soda reacting with the lemon juice).

4. Pour cake batter over rhubarb,  and bake until toothpick inserted into center comes out clean, about 45-50 minutes.

5. Cool cake for about 5 minutes in pan then place a plate on top, hold firmly and flip over to un-mold. Remove the parchment paper carefully (if you used any).

Fresh out of the oven!
In the end I think all my obsessing over this recipe really paid off.  Afterall, I got to make and eat this lovely cake 3 times in the pursuit!  It's become a favorite in my house so I'll probably have to make it again soon!

Notes: If you do not have palm sugar you can substitute brown sugar in equal amounts.  Maple syrup can also be used instead of agave nectar.


*Photo Courtesy of FreeDigitalPhotos.net.

Sunday, May 15, 2011

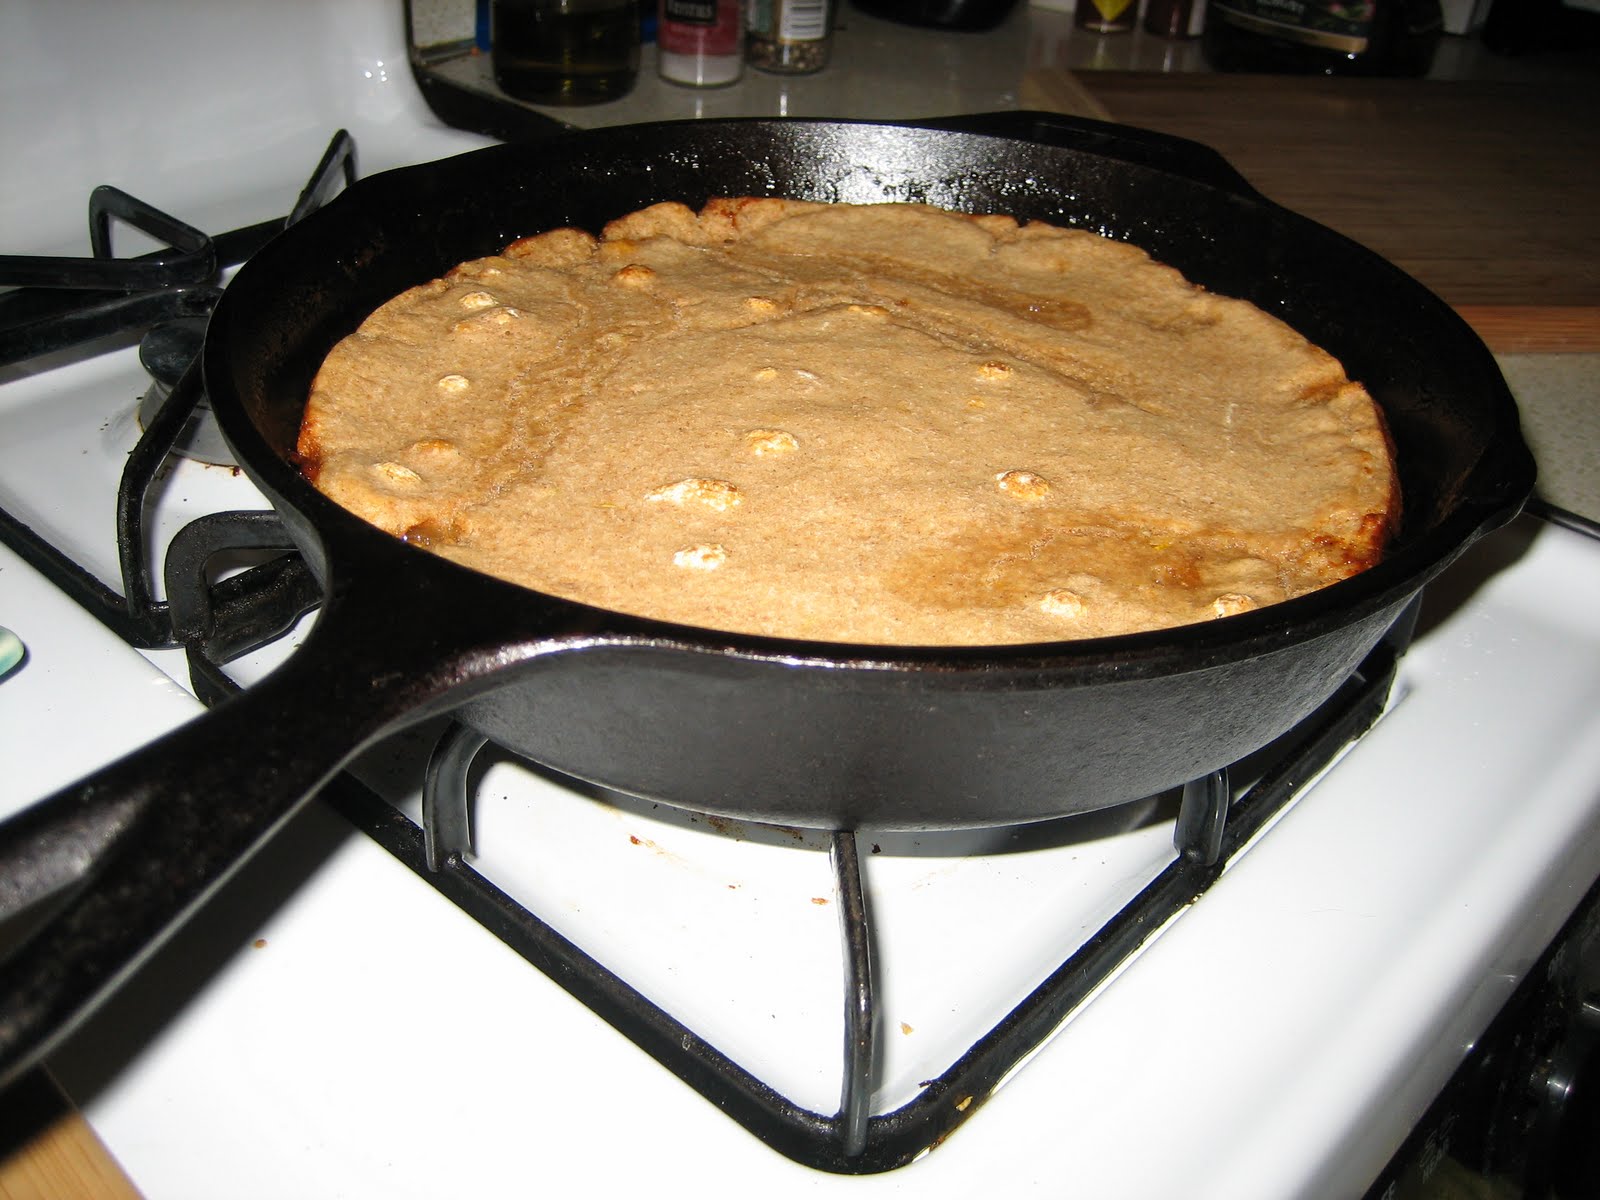
Apple Dutch Baby

The weather is still not great and once again I am stuck inside.  While browsing around the food sites I found a recipe for a "dutch baby" which sounded kind of naughty to me but it was on a food blog so I figured it couldn't hurt to click on it.  I am so glad I did!

This is really a go-to dessert in our house because its so quick and easy and we always have the ingredients to make it around our house.  Its kid friendly, adult friendly, and is also cooked in my very favorite cast iron pan which makes me like it more I think.

Apples Cooking in the cast iron skillet.
Apple Dutch Baby

Filling
4-8 Apples (depending on size and how thick you want your filling), any type, my favorite is granny smith
Cinnamon, to taste
1 T Apple cider vinegar
1 T Water
2-3 T Palm Sugar

Topping
1 C Flour
1/2 t Salt
1/2 t Lemon Zest (optional)
6 Eggs worth of Ener-g Egg Replacer (with the 2T of water per egg)
1 C Soymilk
1/2 t vanilla
1 t Cinnamon

1. Preheat oven to 425 F.

2. Slice apples and place them into a 9 inch cast iron skillet.  Saute them on medium high heat, making sure they do not burn for 4-5 minutes.  Add the rest of the ingredients in the filling to the skillet and continue to saute until the apples are just soft. Remove from heat. Spread evenly on bottom of the pan.

3. In a separate bowl mix all the ingredients for the topping.  It will be a little runny. Pour over the apples and immediately put in the oven.  Bake for 20-22 minutes or until the top is slightly browned.  Allow to cool slightly before serving.

I use a spoon to scoop servings out of the skillet and then flip each scoop upside down so the filling is on top.  This is great with some vegan ice cream or with a splash of soymilk.  Makes a very satisfying late night treat!

The little white spots are baking soda that came out of the bottom of the jar I had in little rocks.  Time for a new jar! 

Tuesday, April 26, 2011

No- Bake Carrot Cake!

So in the spirit of spring I have to share this amazing cake with you!  All you really need is a food processor and bam! Its done! This is the original recipe and while I like it, I had to give it my own personal touch!


This recipe yields about eight small servings and is a favorite around Easter.  You can make this ahead; just cover and refrigerate.  This cake is extra awesome because it travels really well, making it perfect for family get- togethers!

No- Bake Carrot Cake

3 C. carrot, finely grated (I use the attachment on the food processor)
2 C. pecans, ground in a food processor
1/4 C. raisins, roughly chopped
1 t. nutmeg
1 1/2 t. pumpkin pie spice
1 C. dates, pitted
1/2 C. fresh orange juice
1/2 t. salt
1/2 t. orange zest
1/2 C. desiccated coconut

1. Put carrots, pecans, raisins, salt, zest, spices, and coconut in a large bowl.
2. Process the dates with the orange juice until smooth.  Add to bowl and mix well. 
3. Now you can form them into the shape you desire.  I use a small sour cream container as a mold and I end up with two cakes (like the one pictured).  You can also make one large cake using either a mold or your hands and a plate.

Creamy Frosting

1 1/2 C. cashews (raw or roasted, but not salted)
1/2 C. water
2 T. agave
3 T. coconut oil
1 T. vanilla
1/4 t. fine sea salt

Blend everything in a food processor until smooth.

Notes: I usually chill the cake and the frosting before attempting to frost the cake.  This makes frosting the cake easier but by no means is necessary.  Many times I have skipped any kind of chilling and just frosted the cake at room temperature.  If your gentle, it will turn out fine!

Once you are done frosting the cake you can chill it to help it firm up a bit if you like.  I usually let it sit out for about 20 minutes before serving.  Helpful tip: don't tell anyone its raw (unless they ask), enjoy the moment when they try to figure out how the delicious cake they are eating is constructed!

Sunday, April 3, 2011

Coconut Bread

This weekend has been all about amazing food! (More on that later) Unfortunately. much of it was so delicious that I didnt have time to snap some photos.  Oh, well, I'll just have to make it again! This recipe I actually adapted from the website Honest Cooking.  Of course the original recipe is not vegan, and uses white flour, so I decided to make my own version which just so happens to be the mouthwatering type of delicious!


Ingredients
1 C. grated unsweetened dried coconut
2 C. Whole Wheat Flour
1/4 C. Raw Agave Nectar
1/4 C. Palm Sugar (granulated)
1/4 C. Honey
1 T. Baking Powder
1/4 C. unrefined Coconut Oil
1 C. Coconut Milk (I use the milk in a can which can separate. I used 3/4 C. of  Solids, and 1/4 C. of the liquid)
1 1/2 t. Ener G Egg Replacer + 2 T warm water
2 t. Vanilla Extract

1. Preheat Oven to 350 F. Put the coconut oil in a metal bowl and place in the oven while it preheats.

2. Toast the Coconut. To do this I simply spread the coconut out on a piece of tin foil and placed it in the oven while it was preheating. Once the perimeter of my coconut started to brown I stirred it with a spoon so it all toasted evenly. About half of the coconut should be lightly browned and it should smell wonderful.

3. In a large mixing bowl combine the flour, coconut, baking powder, and palm sugar.

4. Once the coconut oil is melted remove it from the oven, add the coconut milk, agave, honey, water and egg replacer and stir.  I put the metal bowl over an oven burner on low heat to help melt the coconut milk solids.  Make sure to get out all the lumps by stirring well.

5. Allow wet ingredients to cool slightly.  Just before adding them to the dry ingredients, add the vanilla to the dry ingredients.  Mix wet and dry ingredients until just blended.  Over mixing will cause the bread to be dry and stiff.

6. Pour mixture into a greased loaf pan (no need to flour).  I used cold- pressed olive oil, spreading it around with my hand.  Bake for 45 minutes or until a toothpick comes out clean. (The agave will make it brown quickly but it may not be done inside!)

7.  Allow to cool until the bottom and sides of the loaf pan are just warm to the touch. (10-15 minutes) I use a knife around the outside to loosen up the bread before tipping it out onto a clean kitchen towel. It is very important to allow the bread to cool otherwise it will break apart when you try to remove it from the pan.

This bread is so delicious we often eat it plain, but it is wonderful with earth balance butter.  It is also blissfully delicious when accompanied with a hot cup of good jasmine tea.

Fresh out of the oven!